Recent Posts

Saturday, 31 October 2015

'It's a witch!'- Last Minute Halloween Make-up Tutorial

Hi Everyone,

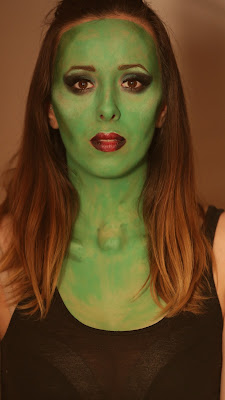
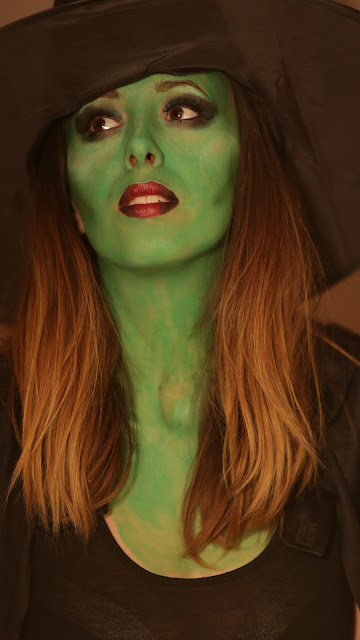
I've got look number two coming your way now- a green witch make-up tutorial modelled by this stunner, Amy...


STEP ONE


Prepare your skin by removing any make-up and oils, I would suggest using a micellar water for this. Any oils will interfere with the face paint. Also, put on the outfit you will be wearing as the paint is going to come down the body (the areas that are on display)and move the hair out of your face!

STEP TWO


Simply apply the green face paint, this one is from Snazaroo, all of the face, neck and chest (and anywhere else that will be on display). You will need to do a couple of layers to build the colour intensity, but make sure the layer underneath is dry first. 


STEP THREE


Just like with normal foundation, contour and highlight, target these areas in the same way but replace them with green shades. So, use a darker green face paint on the hollows of the cheeks, temples and jaw line and blend (this is quite difficult because the paint is water based and smudges- perhaps use oil based make-up if you can as the consistency is easier to blend). And then mix a little bit of green and white paint together and apply it under the eyes in a triangle shape, down the middle of the nose and in the centre of the forehead. You can build either as much as you desire, I wanted a strong contour so it does stand out quite a lot. 


STEP FOUR


Then use the same colours, add some detailing to the neck bone structure to make it appear more skeletal- putting a lighter shade on the tops of the bones and defining them with darker shades. Blend this out also.

STEP FIVE


Now for the eyes! Start off by mapping out the initial shape you want to go for on the eyes, I did this with a dark green eye crayon from Barry M. This will act as a base for the eyeshadows and help the longevity of the eye make-up.

STEP SIX


With a medium-dark green eyeshadow shade, apply this all over the lid. Then, with a black eyeshadow, pat this onto the outer corner of the eye and in the crease and wing it out a little. Then with a fluffy blending brush... blend, blend, blend! It isn't overly crucial to blend as this is Halloween, you can get away with more striking make-up- that's my excuse anyway! 

STEP SEVEN


Bring the black and green under the eye too and blend them together. 

STEP EIGHT


Grab a preferably waterproof black, kohl eyeliner end put it in the water line and upper lash line. With a black, liquid eyeliner felt tip (whatever you find easiest), line the upper lash line and create a flick. Pop on some false eyelashes and mascara. 


STEP NINE


Using a small paint brush fill in any little, skin coloured areas with the green face paint. This will usually be around the mouth, nose and eyes. Once you've done that, grab a vampy lipstick- this is Dark Side-MAC and apply it to the lips. Then, with a damp brush, get some black eyeshadow and put it on the outer corners of the mouth and blend across to make a gradient. 

All make-up done! Now, get your cape and witch's hat a pose for those photos!


That is all the Halloween posts you'll be getting from me this year, unfortunately. I hope you have an amazing Halloween and take lots of photos with your friends and soak up the craziness! 

Thanks for reading!

Love from
Isabel x


Here are some make-up related links to my 'Halloween Series' from last year:

Cracked Doll Face:

Scary Cheshire Cat:

Zombie:

Skeleton:

Vampire:


Share:

Thursday, 29 October 2015

Halloween Series- Creepy Clown


Hi Everyone,

It is finally that time of year again where I can bring out the face paint! Halloween is looming and I have a couple of make-up looks to hopefully inspire your costume decisions! I have decided this year that I wanted the looks to be more accessible. 

Here is look number one, a creepy clown, modelled by my gorgeous friend Remy...


STEP ONE


Start with a clean face and remove any oil from the skin so the paint stays on better later on. Simply do a normal skin base using, foundation, concealer and powder. Then contour your cheeks more than you would usually to give the effect of rounder cheeks (like a clown). The easiest method of this, personally, is by sucking your cheeks in like a fish! 

STEP TWO


Using a bright coloured eye shadow (I chose pink), apply this with a damp eyeshadow brush on the the inner-mid part of your eyelid. (Dampening the brush will increase the pigmentation and intensity of the colour). 

STEP THREE


Pat some black eyeshadow onto the outer corner or the eye and eyelid crease (feel free to wing this out as much as you want but I wanted to keep the eyes looking as round as possible). And with a fluffy blending brush, blend these colours together. Don't worry too much as this look isn't supposed to be refined, it's Halloween! 

STEP FOUR


With a felt tip liner (or any black, liquid liner you have), create an extended flick running across the lash line.

STEP FIVE


Bring this liner underneath the eye too and down past the tear duct. 


STEP SIX


Now for the clown-esque detailing. Put a tiny dot above each eyebrow as to where you want the triangle points to be. Then draw a triangle and fill it in. I kept adjusting it, so just go with it really!


STEP SEVEN


Apply, quite a dramatically, a different colour eyeshadow under the eyes. I blended a couple together but I wanted the lines to stand out also.

STEP EIGHT


Then, once again using your trusty eyeliner draw a smaller triangle underneath the eye. I also added some glittery, blue dots onto each point and popped on some mascara.

STEP NINE


Map out the mouth using the eyeliner and either fill in the lips with a black lipstick (which I couldn't find) or black face paint. With a very thin painting brush create lines either side of the mouth and an enhanced cupid's bow- I went for triangular to keep with the theme but I think a heart shape would look good too. And then draw on a nose.

STEP TEN


Once that has dried, get a small amount of white face paint and put a little dot on the nose and mouth to make the look more animated. 

STEP ELEVEN


It's collar time! Using a wide-ish brush (I used a Real Techniques Foundation Brush) to make stripes down the neck and onto the chest. 

STEP TWELVE


As you can see, I changed the shape at the end of the stripes, so just play around with them really.

STEP THIRTEEN


Using a black liner or face paint, outline the collar and make it look more cartoon like. I did add some black eyeshadow here and there to make it all stand out more against Remy's skin. 

ALL DONE! 

Here are some posed shots for yah!


Thanks for reading!

Here are some make-up related links to my 'Halloween Series' from last year:

Cracked Doll Face:

Scary Cheshire Cat:

Zombie:

Skeleton:

Vampire:


Love from
Isabel x


Share:

Tuesday, 16 December 2014

Sparkly Purple Party Make-up!

I love this time of year as it gives me an excuse to wear sparkles! I wanted to create an affordable, simple make-up look that can be worn to a Christmas or New Years celebration. Like I said, I love a bit of sparkle, so this look has multiple glittery products, but of course feel free to calm it down...but really, when else can you go a  bit crazy with make-up if it isn't now! You may recognise my beautiful friend Alex, she modelled one of my Halloween make-up looks! I specifically chose her for this look as her hair is purple and compliments all of the purple shades I have included on the eyes. So, if you would like to achieve this look or even just get some inspiration...keep reading! 


Alex arrived at my house with her base make-up already applied so I could just crack on with the eye make-up as of course this is the focus. However, if you recreate this make-up look I would advise doing the eye make-up first as the products do tend to fall beneath the eye, therefore on to your face. Oh my... that glitter does not budge easily! In some of the latter pictures you will see some of the eyeshadow just under the eye but we just wiped it away and reapplied concealer. Anyway, let's jump right in!


STEP ONE


I firstly applied shade 2 from the Revlon 583, Exotic palette. This a light purple shade. I popped several layers of this all over the eye lid and slightly above the crease to build up the colour intensity. In the inner corner of the eye I added a light, shimmery champagne eyeshadow to open up the eye more and to add contrast to the smokey tones that appear later on. 

STEP TWO


I then darkened this slightly with a mushroomy coloured eyeshadow, I applied this into the crease to add definition and then blended. 

STEP THREE


I wanted the overall make-up look to have a winged effect so I applied Rimmel: Scandaleyes eyeshadow stick, 006, Paranoid Purple (which is just a dark, shimmery purple) as a guideline. I popped this mainly on the outer corner (still trying to keep the inner corner as light as possible) on both the upper and lower lash line, and smudged it a little.

STEP FOUR


This is where the smokiness really began! I applied a black eyeshadow ('Blackout' from the Urban Decay Naked 2 Palette) onto the outer corner, making sure that the wing was still defined and a gradient was obvious from light to dark. I also popped this into the crease, once again for definition. I then blended and blended and blended. Blending softens the colour so I kept reapplying the black until I was happy with the darkness.

STEP FIVE


I brought the darker shades onto the lower lash line as well to make it all that little bit more dramatic. GLITTER TIIIME! Using a damp eyeshadow brush, I dipped the flat side into a black and purple glitter pigment by Barry M (No.23), and patted it all over the eye lid. I did several layers for intensity. I then reapplied the light champagne shade into the inner corner as it was beginning to look a bit dull and popped some onto the brow bone as well. 
Also on the glitter front I grabbed the bright purple Glam Crystals shade from Collection and lined the upper lash line. You could use a normal black eye liner but as the title suggests, 'Sparkly Purple' is the aim!

STEP SIX


Add some lashes... I mean you're going to a party! I just used some massive, voluminous ones, but use whatever you feel comfortable in!

We then tidied up all of the fallout from beneath the eye and added a bit more of a contour to the cheek bones. I wanted the eyes to do all of the talking so we chose a light pinky/peach lipstick to tie everything all together without detracting from the eyes! 


FINISHED
Here are some posed shots!


Hope this has helped!

Speak soon!
Isabel x


Share:

Tuesday, 25 November 2014

My New Favourite Brow Product: 'Brow Satin' by Maybelline

I had previously used just a dark brown eye shadow and an angled make-up brush to define and fill in sparse areas of my brows. It definitely did the job but it didn't give the effect I really desired. I saw this product advertised on the TV and saw how natural the end result was, so, I thought I would give it  a go...especially as it is only £5.99!


This is two products in one- a waxy pencil on one end and a powder on the other. 


I firstly apply the pencil to add definition, I use small, light, feathery strokes (like the lower demonstration) to create a more natural look. 


I then pop the powder on top to set the pencil and lightly fill in any sparse areas.


It lasts all day and can create multiple brow looks. I personally prefer my eyebrows to be quite dark (to match my hair for one) and it definitely allows for that but of course you could use the powder on its own for a softer look, so the product is very versatile and an absolute bargain. 

There is a very good colour range as well but they seem to be out of stock quite a lot as they are new, but if you can...Go out and buy iiiiit! 


Speak soon!
Isabel x


Share:
© isabel's insight | All rights reserved.
Blogger Template Developed by pipdig