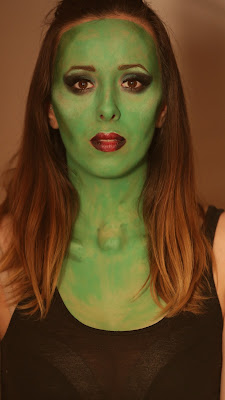
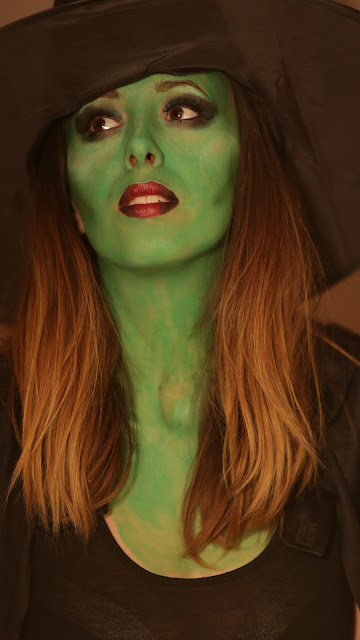
I've got look number two coming your way now- a green witch make-up tutorial modelled by this stunner, Amy...
STEP ONE
Prepare your skin by removing any make-up and oils, I would suggest using a micellar water for this. Any oils will interfere with the face paint. Also, put on the outfit you will be wearing as the paint is going to come down the body (the areas that are on display)and move the hair out of your face!
STEP TWO
Simply apply the green face paint, this one is from Snazaroo, all of the face, neck and chest (and anywhere else that will be on display). You will need to do a couple of layers to build the colour intensity, but make sure the layer underneath is dry first.
STEP THREE
Just like with normal foundation, contour and highlight, target these areas in the same way but replace them with green shades. So, use a darker green face paint on the hollows of the cheeks, temples and jaw line and blend (this is quite difficult because the paint is water based and smudges- perhaps use oil based make-up if you can as the consistency is easier to blend). And then mix a little bit of green and white paint together and apply it under the eyes in a triangle shape, down the middle of the nose and in the centre of the forehead. You can build either as much as you desire, I wanted a strong contour so it does stand out quite a lot.
STEP FOUR
Then use the same colours, add some detailing to the neck bone structure to make it appear more skeletal- putting a lighter shade on the tops of the bones and defining them with darker shades. Blend this out also.
STEP FIVE
Now for the eyes! Start off by mapping out the initial shape you want to go for on the eyes, I did this with a dark green eye crayon from Barry M. This will act as a base for the eyeshadows and help the longevity of the eye make-up.
STEP SIX
With a medium-dark green eyeshadow shade, apply this all over the lid. Then, with a black eyeshadow, pat this onto the outer corner of the eye and in the crease and wing it out a little. Then with a fluffy blending brush... blend, blend, blend! It isn't overly crucial to blend as this is Halloween, you can get away with more striking make-up- that's my excuse anyway!
STEP SEVEN
Bring the black and green under the eye too and blend them together.
STEP EIGHT
Grab a preferably waterproof black, kohl eyeliner end put it in the water line and upper lash line. With a black, liquid eyeliner felt tip (whatever you find easiest), line the upper lash line and create a flick. Pop on some false eyelashes and mascara.
STEP NINE
Using a small paint brush fill in any little, skin coloured areas with the green face paint. This will usually be around the mouth, nose and eyes. Once you've done that, grab a vampy lipstick- this is Dark Side-MAC and apply it to the lips. Then, with a damp brush, get some black eyeshadow and put it on the outer corners of the mouth and blend across to make a gradient.
All make-up done! Now, get your cape and witch's hat a pose for those photos!
That is all the Halloween posts you'll be getting from me this year, unfortunately. I hope you have an amazing Halloween and take lots of photos with your friends and soak up the craziness!
Thanks for reading!
Love from
Isabel x
Here are some make-up related links to my 'Halloween Series' from last year:
Cracked Doll Face:
Scary Cheshire Cat:
Zombie:
Skeleton:
Vampire:


No comments
Post a Comment