Big This Week

Recent Posts

Tuesday, 28 October 2014

Halloween Series: Half Pin-Up, Half Skeleton Make-up!

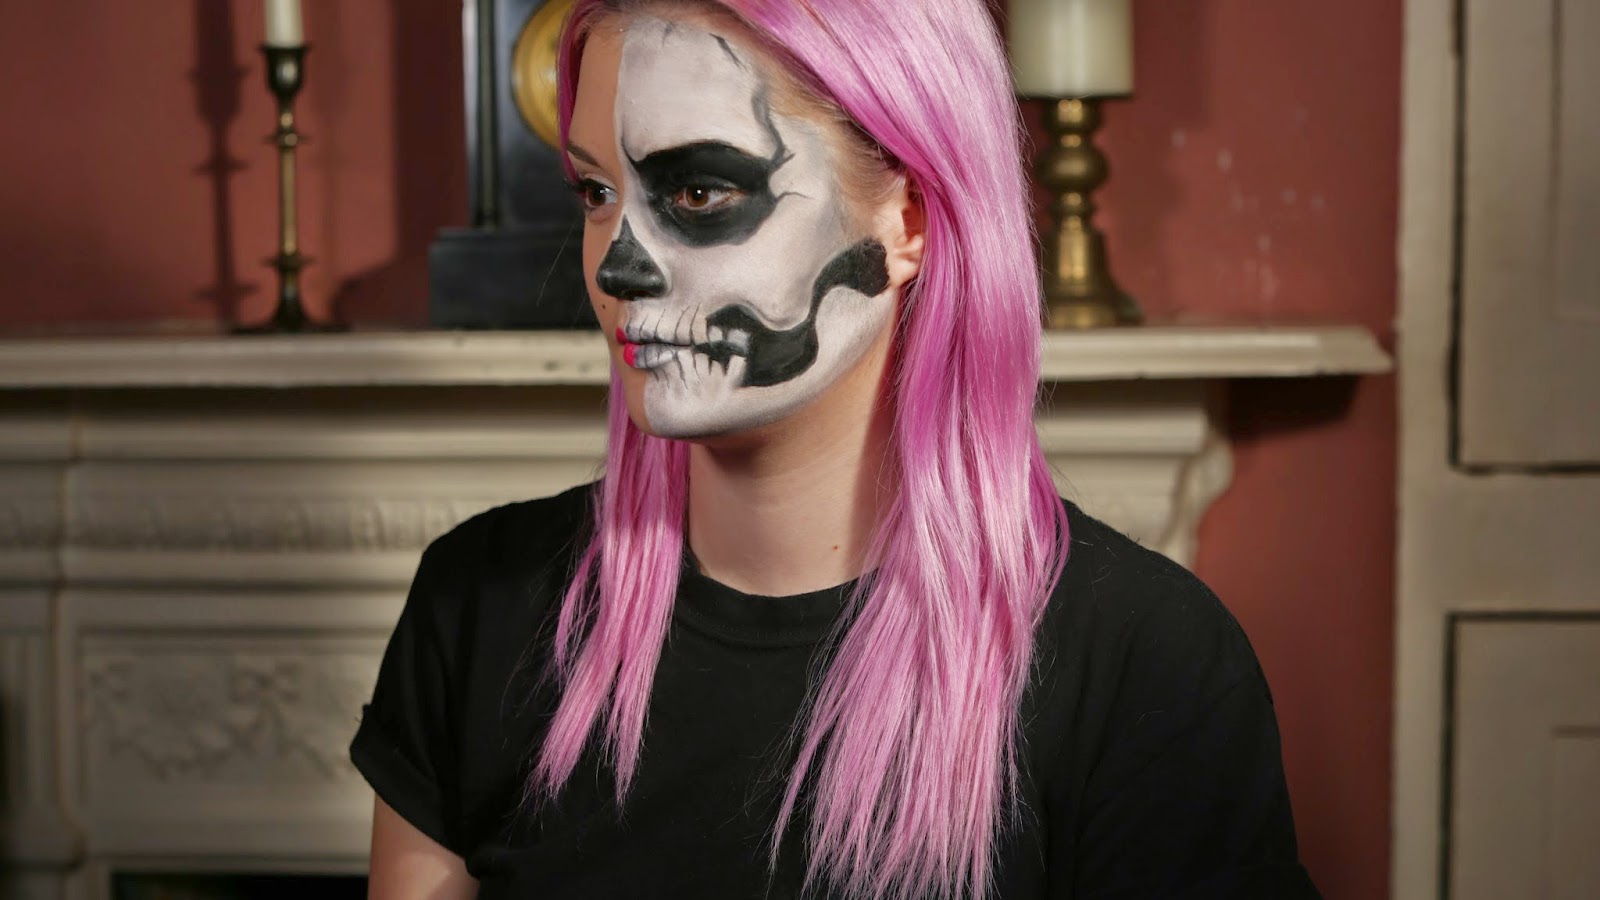
I wasn't originally going to do this make-up look, but one of my closest friends (who is at uni so I can't actually guide her in person) asked me to help her out as she wants to dress up as a skeleton this year. I documented the process and was just going to send the images to her but I have actually surprised myself as to how well it went, so I thought I would share it with you guys too! I did some research on Google and YouTube to gather some inspiration and then asked my rather gorgeous friend, Alex, to model this look for me... 


Keep reading to find out how I did it!

STEP ONE


Alex arrived at my house wearing some very natural looking make-up so I decided to take advantage and not 'start from scratch' as it were, considering half of the face in this look is supposed to be 'pretty'. She was just wearing Rimmel: Lasting Finish, 25 Hour foundation (100 Ivory), Collection: Lasting Perfection concealer (Fair, 1), some Rimmel: Clear Complexion powder and a light pink blush (which I added to later on) and Rimmel: Scandal Eyes Volume Lash mascara. But if you are doing this from scratch just add a simple base, you don't want to detract from the skeleton!

STEP TWO


I used a white eyeliner pencil by Barry M to sketch out the design, firstly sectioning the face half way and then drawing around the areas that would be black.

STEP THREE


Once all of the outlines were drawn, I filled in the gaps using a white face paint by Snazaroo. I applied a few layers of paint, allowing each layer to dry in-between, to create a greater coverage.

STEP FOUR


I then picked up my Collection 24 Hour Felt-tip Liner and carefully filled in the 'bone structure'. I originally applied black face paint but I found it too fiddly so switched to the eyeliner pen, but if you're confident enough then the face paint would probably last longer on the skin. 
I started to apply some shading and then realised I hadn't filled the nose in!

STEP FIVE 


I then filled the nose in, it sounds gross, but make sure that the nostril is covered as well!

STEP SIX


Then it was time for some shading! I just used my MUA: Winter Forest palette and dipped my brush into the grey tones, so, 'Dove Grey' and 'Slate'. I applied these shades to the outer most areas of the face and along the jaw line to add more definition. I then wanted to emphasise the shapes I had made previously so added some shading there too, with lots of blending!

STEP SEVEN


I left the teeth till last because... well... I was dreading doing them! I picked up a tiny weeny paint brush, dipped it into some water and then into my 'Blackout' (matte black) eyeshadow from my Urban Decay: Naked 2 palette (you could use black face paint but because I was scared I thought I would be able to remove the eyeshadow a lot easier than paint if I needed to!) I firstly darkened the centre of the lips so they appeared thinner and then made tiny brush strokes upwards and downwards and then rounding the edges...to make them look like teeth. I would advise having a visual aid to copy from. I got rather annoyed and stressed out at this point but I believe it all came together nicely! 

STEP EIGHT


I then went back in with the grey tones. I applied a small amount underneath each tooth, and blended the grey into the previous application. I also added a bright pink lipstick onto the 'pretty' side of Alex's face. This not only made the 'Pin-Up' look more complete but it created a vast contrast to the mono-chrome look on the other side (it also went with Alex's hair!)

STEP NINE


 I then added a small beauty spot and some winged eyeliner onto Alex's lash line. The prettiness contrasted well with the quite horrible looking skeleton!

FINISHED!

You could do a complete skeleton face, just by mirroring the look onto the other side... this means that it is also more wearable for guys too!

Here are some more photos...


I hope this has helped!

Speak soon!
Isabel x


Share:

Wednesday, 22 October 2014

Rimmel: 'Provocalips' Review

I love a good ol' bold lip pretty much all year round but I am always dubious about the longevity of the lip product. I worry constantly, thinking it has rubbed off, gone all dry and flakey, or smudged across my face! So, when I saw the advert on telly for the new 'Provocalips' lip range by Rimmel I was rather intrigued to say the least. Me being me... I went, quite swiftly, to my local Superdrug and bought one to try out...of course it was a deep, berry tone! (550- 'Play With Fire' to be more precise). 

The Review

Packaging 


I don't really know what to say... it looks slightly childish but quite clearly separates the two ends and successfully shows the colour of the product. 


The product is split into two halves, the vibrant colour on one end and a balm on the other. Each having a spongey applicator. Both of which are easy to access.

Application 

Due to the sponge applicator, the product glides onto the lips very easily and with great precision. Quite a lot does come out on to the applicator so I would advice wiping excess off as a little does go a long way and it could get rather messy, especially with such a vibrant colour (I'm speaking from experience...oops!) Like I said before, there are two steps to this product. You firstly apply the colour but then have to wait a minute or so for it to set and dry, preferably with your lips parted. Once it has dried you then add the balm! Easy!

Longevity

Right then... this is the important section! THIS DOES NOT BUDGE! When I was testing this I didn't reapply at all throughout the day and I drank and ate as usual. The product claims to last 16 hours... I mean I wasn't awake for that long but through the duration I was awake, I wasn't disappointed. When I drank a cup of tea there wasn't any transfer onto the mug and when I ate, it didn't smudge. All of my family were just as shocked as I was... I really didn't believe it would last as long as it did! However, I would say that it does dry throughout the day, so keep it with you if you're out and about so you can use the balm. 
It is quite 'interesting' to get off at the end of the day though... I was sat on my bed for at least 5 minutes with a cotton wool pad drenched in my Garnier Micellar Cleansing Water, scrubbing it away, whilst my Dad laughed at me. Even so, it was worth the faff and I am VERY impressed!

Price

This retails at £6.99! I definitely don't mind paying that for this product... I will be popping back to the shops to gather the majority of the collection, along side a few for some family members that I have raved about it too! 


Here are some pictures of me wearing it... I would say though, it is a darker red than it appears in this photo!

I hope this is helpful!

Speak soon
Isabel x

Share:

Sunday, 12 October 2014

Autumn Lipstick Picks- HIGH STREET


I absolutely love autumn AND makeup... so it only seems right to write a little summin' summin'! 

A dark, berry lip colour is perfect for this time of year. It not only echoes the autumnal leaves and the beginning of Christmas, but is also quite... sexy! Whenever I put one of these lipsticks on I instantly feel more va-va-voom and the blue undertone in all of these products brings out the whiteness in your teeth (which is always good)! Another reason why I love all of these products is because, I believe, they compliment my hair and eye colour and bring out the warmth in my skin tone.

I'm going to use the image from above as a reference for the rest of my post- starting from the left to the right. 

1. Sleek- Cherry (No.790)

This is a very deep red tone, in some lights it is quite pinky, but still quite earthy and rich. The main reason I bought this product was because I misplaced my MAC 'Russian Red' lipstick. Although I loved that lipstick dearly, it was VERY drying (due to its matte formula). I couldn't afford to spend too much on a replacement, so when I was in my local Boots I decided to look at the Sleek collection as I've been impressed with the price and quality with other products in the past. 
My lips get quite dry at this time of year (like a lot of people)... so I would advise applying a lip balm before this lipstick. Don't get me wrong... this is moisturising but it does dry quite quickly and when having a sip of drink, for example, it transfers easily. It does tend to bleed as well, so wear a lip liner and apply with a brush.

2. L'Oreal: Color Riche- Cassis Passion (No.376)

First of all... the packaging is sooooo pretty. The formula is very moisturising with a slight sheen It also has incredible staying power. It is a rich pink shade, so is a good transition colour from summer to autumn because it still has some vibrancy and punch like those summery neon shades yet is also sumptuous and sexy. 

3. Rimmel: Starry-Eyed (128)

This lipstick is the more purple toned one out of the bunch. Similar to Cassis Passion, it is sweetly scented and reminds me of a mixture between candy floss and Christmas?! From personal experience I would suggest applying two layers of this lipstick, not only will it increase its longevity but it will also make the colour 'POP' a lot more!


4.  Rimmel: Apocalypse- Eclipse (No.304)

I know this isn't a 'classic' lipstick but the formula dries to a lipstick finish although initially appearing as quite glossy. The applicator makes it so easy to put on, amazing precision, creating a perfectly sculpted lip. I believe this is one of the newer shades in the line along side the new matte ones. It does to tend to transfer but personally... I think its worth it. 


Speak soon
Isabel x


Share:
© isabel's insight | All rights reserved.
Blogger Template Developed by pipdig